What is Arduino? Meet the board
14 minutes · Intermediate
Simulations and quizzes aren't read aloud; pause when you reach them and try them out.
The circuits you've built so far always did the same thing: the LED lit when the battery was connected, and the flasher blinked at its own rhythm. To change their behavior you had to change parts. With a microcontroller you decide the circuit's behavior with code. The same circuit can be a night light one day and an alarm the next, depending on the program you write.
📷 Real-world view
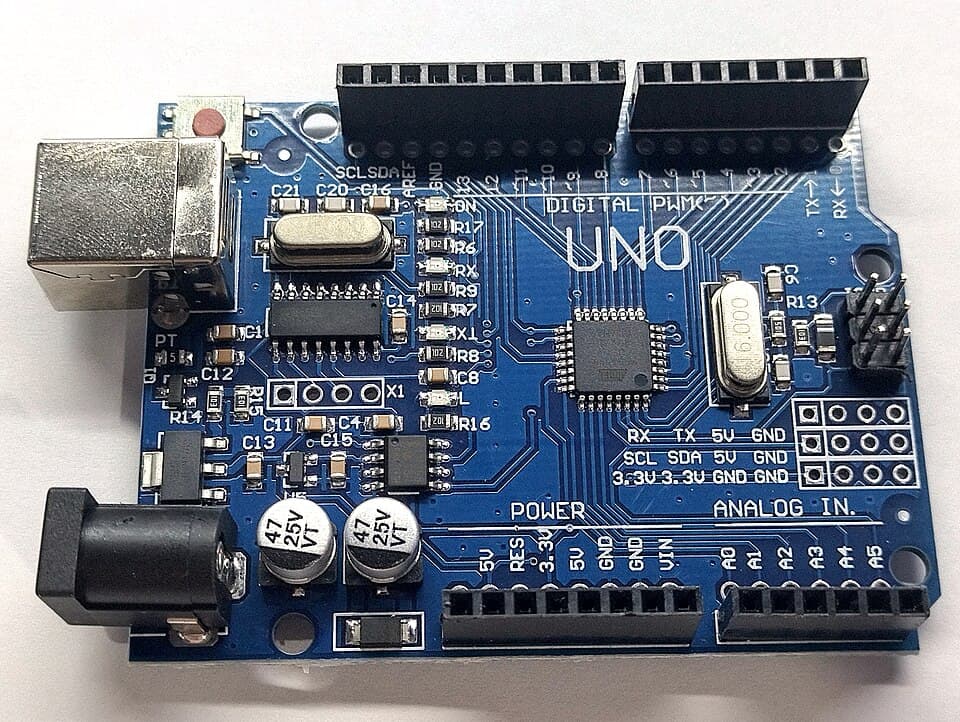
Microcontrollers and Arduino
A microcontroller is a small computer squeezed into a single IC: a processor, program memory, RAM and input-output pins. Most of the electronic devices around you, from washing machines to remote controls, have one.
Arduino is a board and a software environment that make a microcontroller easy for beginners to use. You connect it to a computer with a USB cable, write your code and upload it to the board with a single click. In this course we'll use the most common model, the Arduino Uno. The board carries an ATmega328P microcontroller.
Getting to know the board
Digital pins (0–13)
Work with on/off (HIGH/LOW) signals: lighting an LED, reading a button. Pins 0 and 1 are also used for USB communication, so beginners should leave them free.
PWM pins (~3, 5, 6, 9, 10, 11)
Produce an 'in-between value' by switching on and off rapidly: LED brightness, motor speed.
Analog inputs (A0–A5)
Read a voltage between 0 and 5 V as a number from 0 to 1023: potentiometers, light and temperature sensors.
Power pins
5V and 3.3V: for powering sensors. GND: ground. VIN: the external adapter voltage.
Built-in LED (L)
Connected to pin 13. Used to try out your first program without connecting anything.
USB and power input
USB both uploads programs and powers the board. A 7–12 V adapter is used to run it without a computer.
Limits: so you don't burn out the board
- The current drawn from a pin should be at most 20 mA (absolute limit 40 mA). A single LED with a resistor is fine. Motors, relays and LED strips are never powered directly from a pin; a transistor is needed.
- Don't apply more than 5 V, or a negative voltage, to the pins.
- The total current drawn from all the pins must not exceed 200 mA.
- Don't touch the 5V pin directly to GND. Your computer's USB port protection will cut it off, but it mustn't become a habit.
Prepare your computer
- Download and install the Arduino IDE from the Software section of arduino.cc (free for Windows, macOS and Linux).
- Connect the board with a USB cable. The ON light on the board should light up.
- In the IDE, choose Arduino Uno as the board and the port the board is connected to from the top menu.
- If the port doesn't appear in the list, you may need to install the driver for the CH340 USB chip used on cheap clone boards.
No board? No problem
Every lesson in this course has an Arduino simulator that runs in the browser. You can write and run your code and see the LEDs, button, potentiometer and serial monitor on screen. When you move to a real board, the same code works exactly the same way.Test yourself
1. Which pin is the built-in LED connected to on an Arduino Uno?
2. Which pin supports PWM?
3. Roughly what is the highest recommended continuous current from an Arduino pin?
4. In what range do the analog inputs give a number?
This was the free first lesson of the course
The remaining 9 lessons of Introduction to Arduino, with their simulations and quizzes, unlock when you buy the course.
See the full course →